Maintenance 22.1
Suppress E911 Option
Network Suite | Number Maintenance | Telephone Number | Telephone Number Editor: A Suppress E911 check box was added to multiple telephone related screens so users can set particular telephone networks that do not need an E911 record to be suppressed from E911 file creation and reports. This change will keep E911 records flagged to be suppressed from being pulled into a daily E911 file and scrub reports.
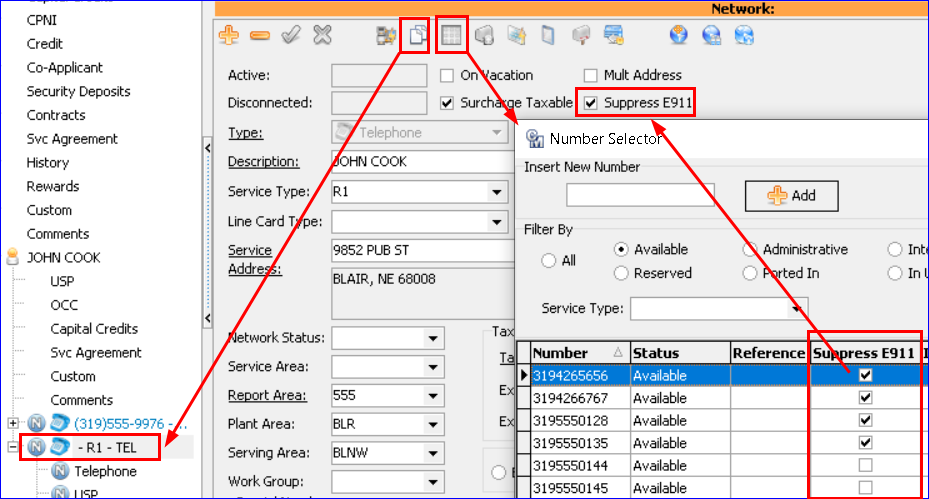
A Suppress E911 check box was added to the Telephone Number Editor and can be checked to suppress E911 for the Telephone Number. The check box is only enabled if the Type is Telephone and will be grayed out otherwise. Checking Suppress E911 on a number with a Status of In Use will activate a message upon posting letting the user know the Suppress E911 option was changed, and a Service Order is needed to update the Suppress E911 flag on the telephone network with the number. A Suppress E911 column was also added to the Telephone Number grid to show numbers flagged to suppress E911. Note: The Suppress E911 checkbox will be disabled for numbers with a Status of LIS (Left In Service).

Service Order | Telephone Network: A Suppress E911 check box was added to the Telephone Network in a Service Order and can be checked to suppress E911 for the Telephone Number. If the telephone network has an E911 record with a function of Insert, Change, or Migrate, and the box is checked, a confirmation message will appear upon post: “A current E911 record exists. Use the E911 Address Maintenance table to update the function and resend the record as needed.” With the box checked, an E911 record will not be created in the E911 Address table or for PSAP file creation. In addition, there will not be a new (N) symbol next to the E911 node, and the fields in the network’s E911 node are disabled/grayed out.

Service Order | Cascade Information | Where To Update: When changing an address on a Telephone Network with the Suppress E911 flag checked, the E911 checkbox in the Cascade Information “Where To Update” window will be disabled and unchecked. After clicking Yes in the Cascade Information screen, the E911 node will not have a new symbol next to it, the E911 screens fields will be disabled/grayed out, and no E911 record will be created for the network.

Service Order | Network | Number Selector | Insert New Number: The Suppress E911 checkbox has also been added to the New Number Editor. The Suppress E911 checkbox will be enabled if the Line Number Type is Telephone. When adding networks on the fly from the Service Order, users can suppress E911 for the new number by checking the box. A Suppress E911 column was also added to the Number Selector screen to show numbers flagged to Suppress E911.

Service Order | Telephone Network | Copy Network: If the Suppress E911 box is checked on a Telephone tier, the Copy Network tool will copy the check over to the new Telephone tier. However, once a number is selected from the Number Selector for the new Telephone network, the Suppress E911 flag will be checked/unchecked depending on the number selected and its maintenance tables Suppress E911 setting. A Suppress E911 column was also added to the Number Selector screen so users can see numbers flagged to suppress E911. If the number selected is flagged to suppress, the new TEL network will be as well. If the new number selected is not checked to suppress, the new number will not have the check.
Service Order | Telephone Network | Disconnect Telephone Network and LIS (Left In Service): For companies using LIS, numbers must remain in service for a certain amount of time after disconnection, so these numbers should not be suppressed from E911. When disconnecting networks with an existing E911 record in the Service Order process, the Assign LIS Numbers screen will not pop up for Networks flagged to Suppress E911. The same is true when a network’s Suppress E911 is unchecked, and a E911 record was never created for the network.
Tools | Mass Processing | Tel/Cel/Pag Mass Insert/Update Wizard: An Action option “Update Suppress E911” was added to the Tel/Cel/Pag Mass Insert/Update Wizard so Telephone numbers can be updated to Suppress E911 Flag in mass. With the Update Suppress E911 selected, clicking the Next button now has a Suppress E911 checkbox in the Line Number selection screen. Checking the box and clicking Next will display “Check Suppress E911” in the information screen. If it is not checked “Uncheck Suppress E911” will display. When the selections are saved on the last screen of the wizard, all Telephone Network Numbers in the selected range will have their Suppress E911 flag updated regardless of their active/inactive network status. Note: If using the “Update Suppress E911” action, LIS (Left In Service) numbers will not be available for selection from the Starting Line Number and the Ending Line Number dropdowns. In addition, if the tool is used to “Mark Numbers As Left In Service,” then Suppress E911 flags are set to unchecked on those numbers.

Reports | E911 | E911 Detail: A Suppress E911 checkbox was added in the Selection Criteria group box, and the word “Detail” was added to the report name. The Suppress E911 checkbox contains a hover over hint reading “When checked, only records flagged as Suppress E911 will be included.” When the Suppress box is not checked, a Suppress E911 column will display in the printed report, and display a “Y” for records flagged to Suppressed E911.

When the Suppress E911 box is checked, only records flagged as Suppress E911 will be returned in the report results, and the header title says “Suppress E911 Only.” A column for Suppress E911 was also added to the .csv output file and will display as “Y” if flagged to suppress.

Grid Reports | Report Type | Network: A Suppress E911 selectable table column option was added to the Grid Report – Network. When selected, the grid report results will include a Suppress E911 column with a check in the box for any number(s) flagged to suppress E911.

811 Locates – Additional State Mapping Vendors
The Locate 811 module was tweaked to include additional states’ mapping vendors, easier access to the email setup, and the addition of an Email Mapping selection within the Locate 811 Email Setup screen. At this time, email mapping for Locate 811s for the states of Iowa, Kansas, New Mexico, Oregon, and Texas are available in Customer Master. Moving forward, as companies work with their Account Manager to request their state’s vendor email format to be added to Customer Master, enhancements were developed to address additional state vendors without the need for an upgrade.
Maintenance | Locate 811 | Email Setup: The Locate 811 tab was removed from File | Preferences | Transmission, and a new maintenance menu was created for handling Locates at Maintenance | Locate 811 | Email Setup. The new Locate 811 Email Setup grid/editor will contain your company’s setup, with icon functionality to Insert, Delete, Edit, Copy, and Refresh email setups. Multiple setups can be inserted if your company does business in more than one state.


Packages | Locate 811: A drop-down was added in the Email Body group box called “Email Mapping.” It contains the Codes and Descriptions from the Locate 811 Email Setup maintenance table and will be used to determine manual email mapping from the screen. It is not required, but users cannot map emails without its selection. The right click option to “Load Fields From Email Body” was removed and replaced with a “Load Email Body” icon (lightning bolt) to the right of the Email Mapping drop-down. Selecting this button is the new way to auto fill the fields from the email into the fields above. In addition, the right click menu in the Email Body group box now contains Cut/Copy/Paste options for those users who prefer a menu option instead of shortcut keys such as CTRL + C and CTRL + V.
