Develop API to Calix Subscriber and Marketing
API to Calix Subscriber & Marketing Cloud
As demand for broadband and managed services skyrockets, Calix’s world-class cloud and software platforms enable broadband providers to simplify operations, excite subscribers, and grow their value. MACC has taken steps to provide seamless integration from Customer Master to Calix to provide a real-time, user-friendly experience. Services, Plant, and Inventory/Equipment updates in Customer Master are sent to Calix in real-time thereby saving user’s valuable time. These work efforts allow Support and Marketing Cloud integrations to move from a batch file process to a real-time process. This also aligns MACC for future integrations with Calix to eliminate swivel chair management.
Users must have a relationship with Calix as a new or existing customer and a MACC administrator activates the Calix API. Contact your Client Solutions Manager if your company is interested in the API to Calix Subscriber and Marketing Cloud.
Customer Master Maintenance Tables
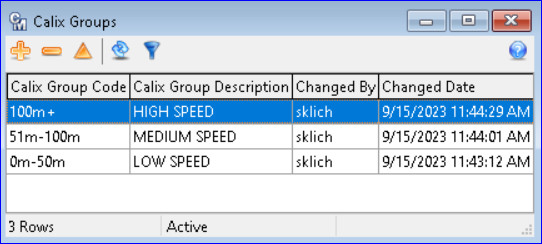
Maintenance | Calix | Calix Groups: A maintenance table was created to house Calix Group information. Calix Group Codes represent non-overlapping groupings of internet speeds for Calix Marketing reports. Clicking the Insert or Edit button will change the grid to an editor screen to enter the “Calix Group Code” and “Calix Group Description.”
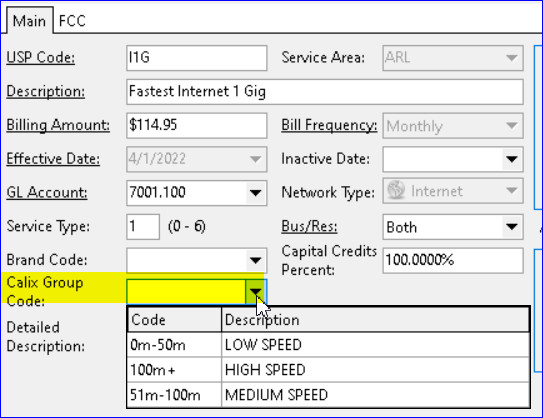
Maintenance | Common | USP Codes: A “Calix Group Code” drop-down menu was added to the USP Codes Editor screen. The drop-down selection displays the Calix Groups from the maintenance screen to set the applicable Calix Group Code for the USP Code.
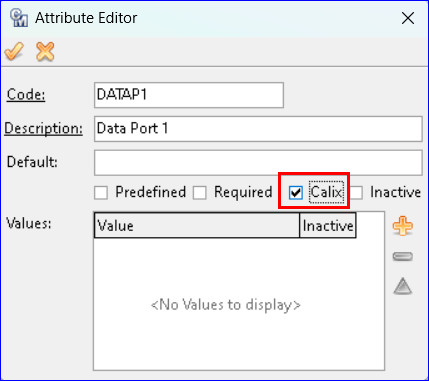
Maintenance | Equipment | Equipment Management: A ‘Calix’ checkbox has been added to the Attribute Editor in the Equipment Management screen to flag an attribute for Calix. A “Calix” column was also added to the Attributes dropdown to show attributes flagged for Calix in the Attribute Editor. Calix only allows certain characters for their Device IDs (alphanumeric, colon, caret, dash). A validation of Device IDs will occur upon Post when the Calix box is checked. A message will display if a Device ID has an invalid character, so the user has an opportunity to correct the ID.
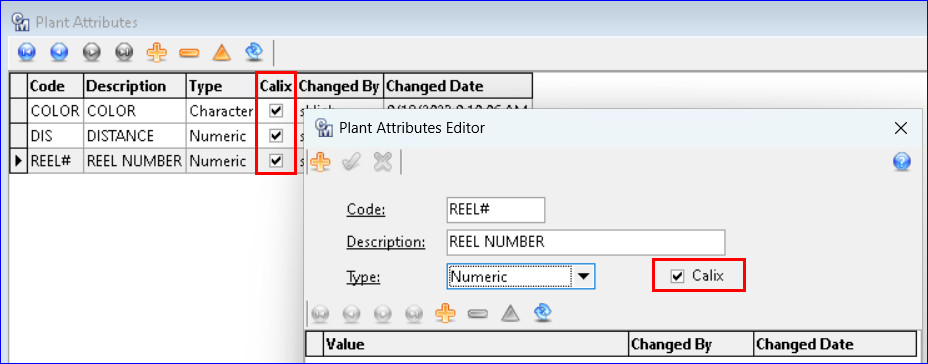
Maintenance | Plant | Plant Attributes: A “Calix” checkbox has been added to the Plant Attributes Editor screen to flag an attribute for Calix.
A “Calix” column was also added to the Plant Attributes grid to show attributes flagged for Calix in the Plant Attribute Editor. A validation of Device IDs will occur upon Post when the Calix box is checked in this editor as well.
Accounting Master
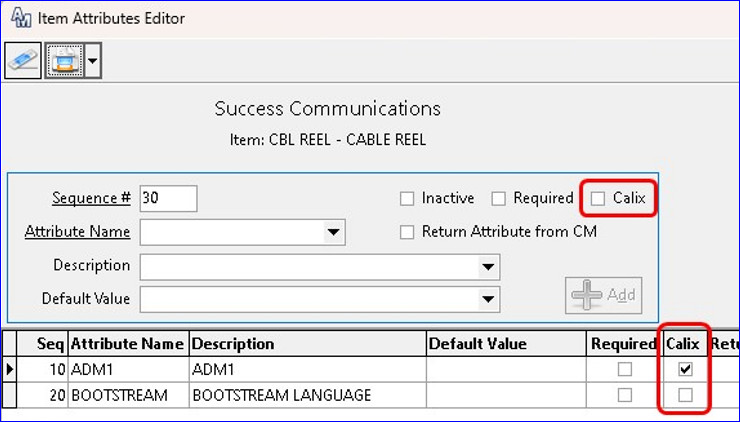
Packages | Inventory | Item: A “Calix” checkbox was added to the Item Attributes Editor in Accounting Master to flag an Item Attribute for Calix. A “Calix” column was also added to the Item Attributes grid to show attributes flagged for Calix. The Item Attributes with a check will be displayed in the Calix Setup Wizard. Additionally, a “Calix” column has been added to the Item Attributes report accessed from the Report button. The column will display a “Y” in the column when an attribute is flagged for Calix. A validation of Device IDs will occur upon “Update” when the Calix box is checked.
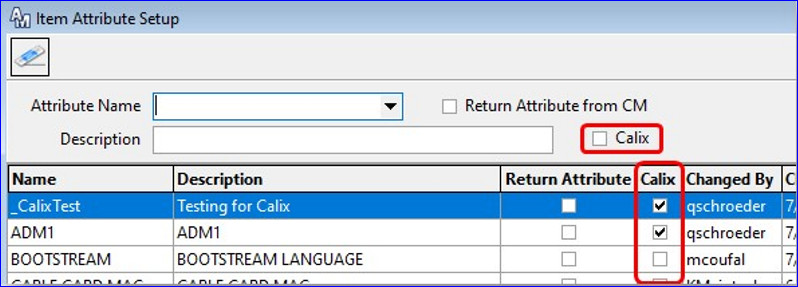
Packages | Inventory | Maintenance Tables | Item Attribute Setup: A “Calix” checkbox was added to the Item Attributes Setup in Accounting Master to flag an Item Attribute for Calix. A “Calix” column was also added to the Item Attributes grid to show attributes flagged for Calix. The Item Attributes with a check will be displayed in the Calix Setup Wizard.
Calix Setup Wizard
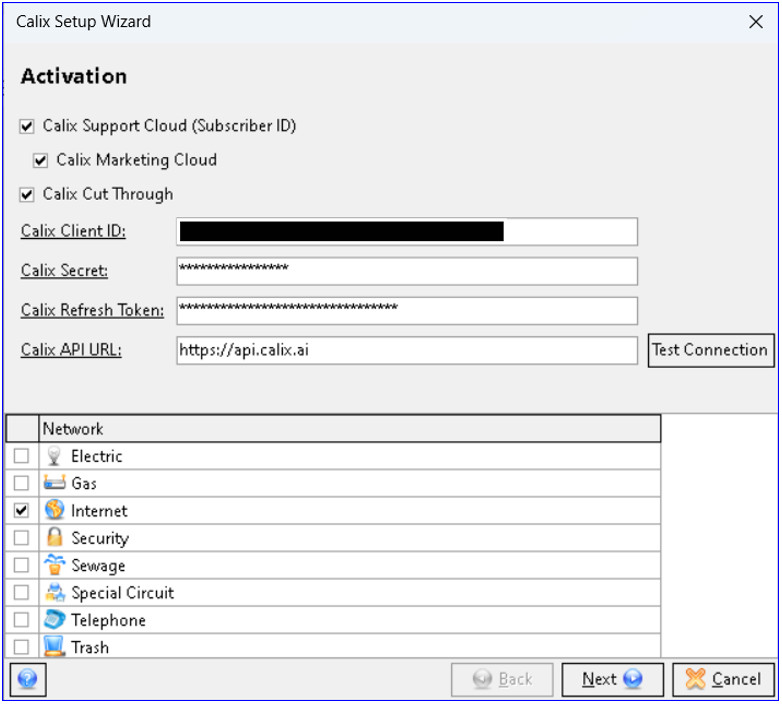
Maintenance | Calix | Calix Setup Wizard: A new “Calix Setup Wizard” was created to activate and set up Calix services.
Activation screen: The first screen of the wizard is used to activate Calix API services and select the desired network types to use with Calix. The services activated will determine the additional screens in the wizard to format and notify Calix of updates via the API. A checkbox option for each Calix service is available and when checked will activate the service.
- Calix Support Cloud (Subscriber ID)
- Calix Marketing Cloud
- Calix Cut Through
The following Calix fields will be used with the Calix API for Calix Support Cloud, Calix Marketing Cloud, and Calix Cut Through. These credentials must be obtained from Calix and are required fields:
- Calix Client ID
- Calix Secret
- Calix Refresh Token
- Calix API URL
A Network grid at the bottom of the screen is used to select the networks to be used with Calix service. A “Test Connection” button can be used to test the connection to Calix.
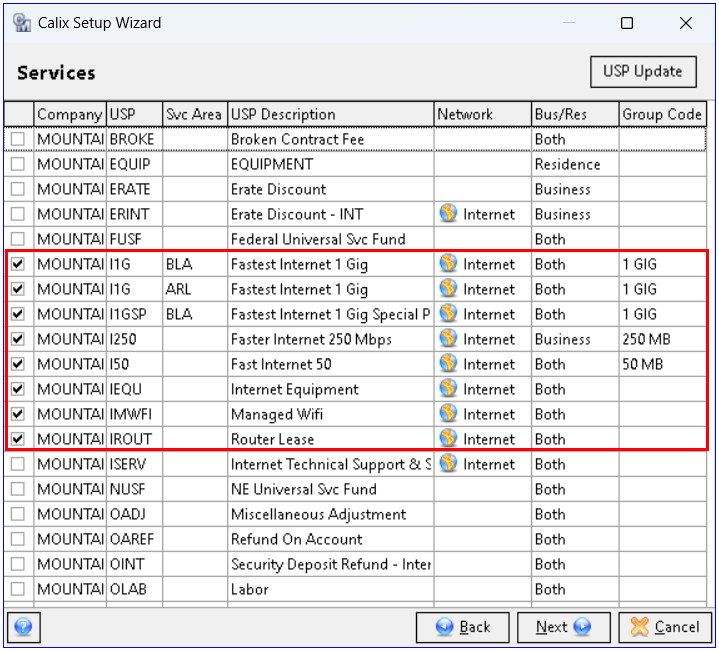
Services screen: The second screen of the wizard is used to select the services needed for Calix Support Cloud. Any changes made to the selected USPs in Customer Master will be sent to Calix via the API so that Calix mirrors Customer Master. The grid will load with USPs based on the Network types selected on the first screen (Activation) of the wizard. USPs that don’t have a network designation will also appear in the grid. Users can check the USPs or use the “Update USP” button to automatically select all Services that currently exist in Calix.
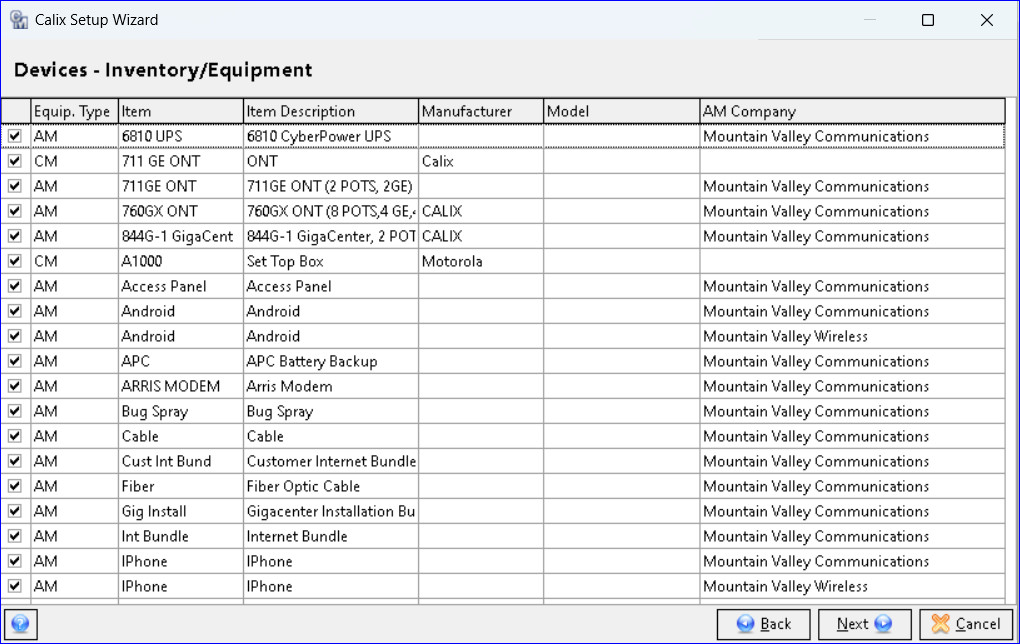
Devices Inventory/Equipment screen: The Inventory/Equipment screen contains a grid that will allow users to select inventory/equipment from Accounting Master and Customer Master. When AM Inventory or CM Equipment updates are made the selected inventory/equipment items will be sent to Calix and are needed for Calix Support Cloud. A right-click menu on the grid allows the user to “Select/Deselect” and “Select All/Deselect All.”
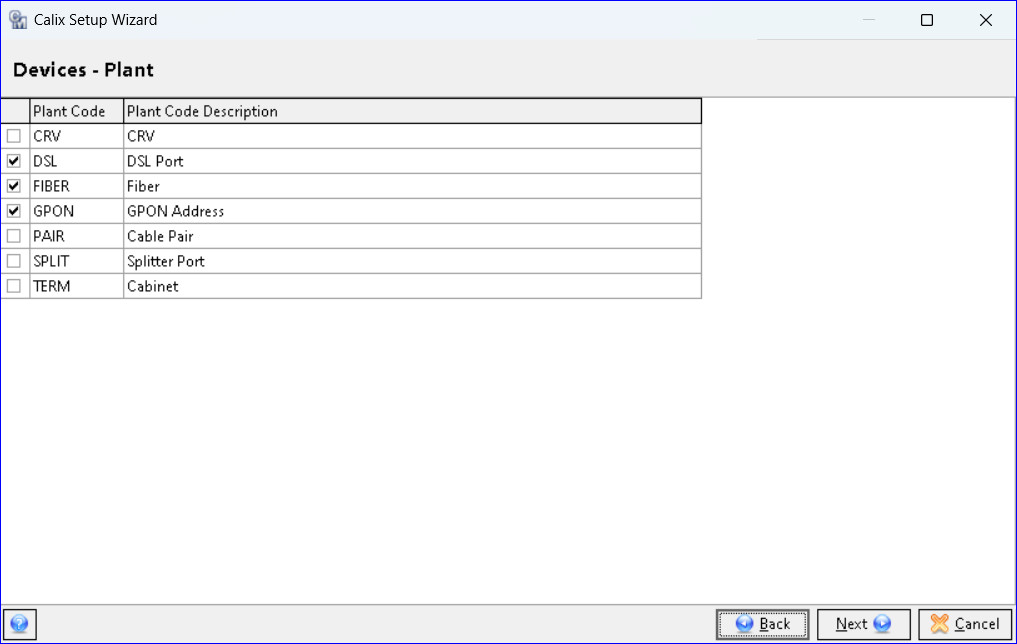
Devices – Plant screen: The Devices-Plant screen contains a grid that will allow users to select Plant Codes they want to track in Calix Support Cloud. When Plant in Customer Master is updated, the changes will be sent to Calix via the API.
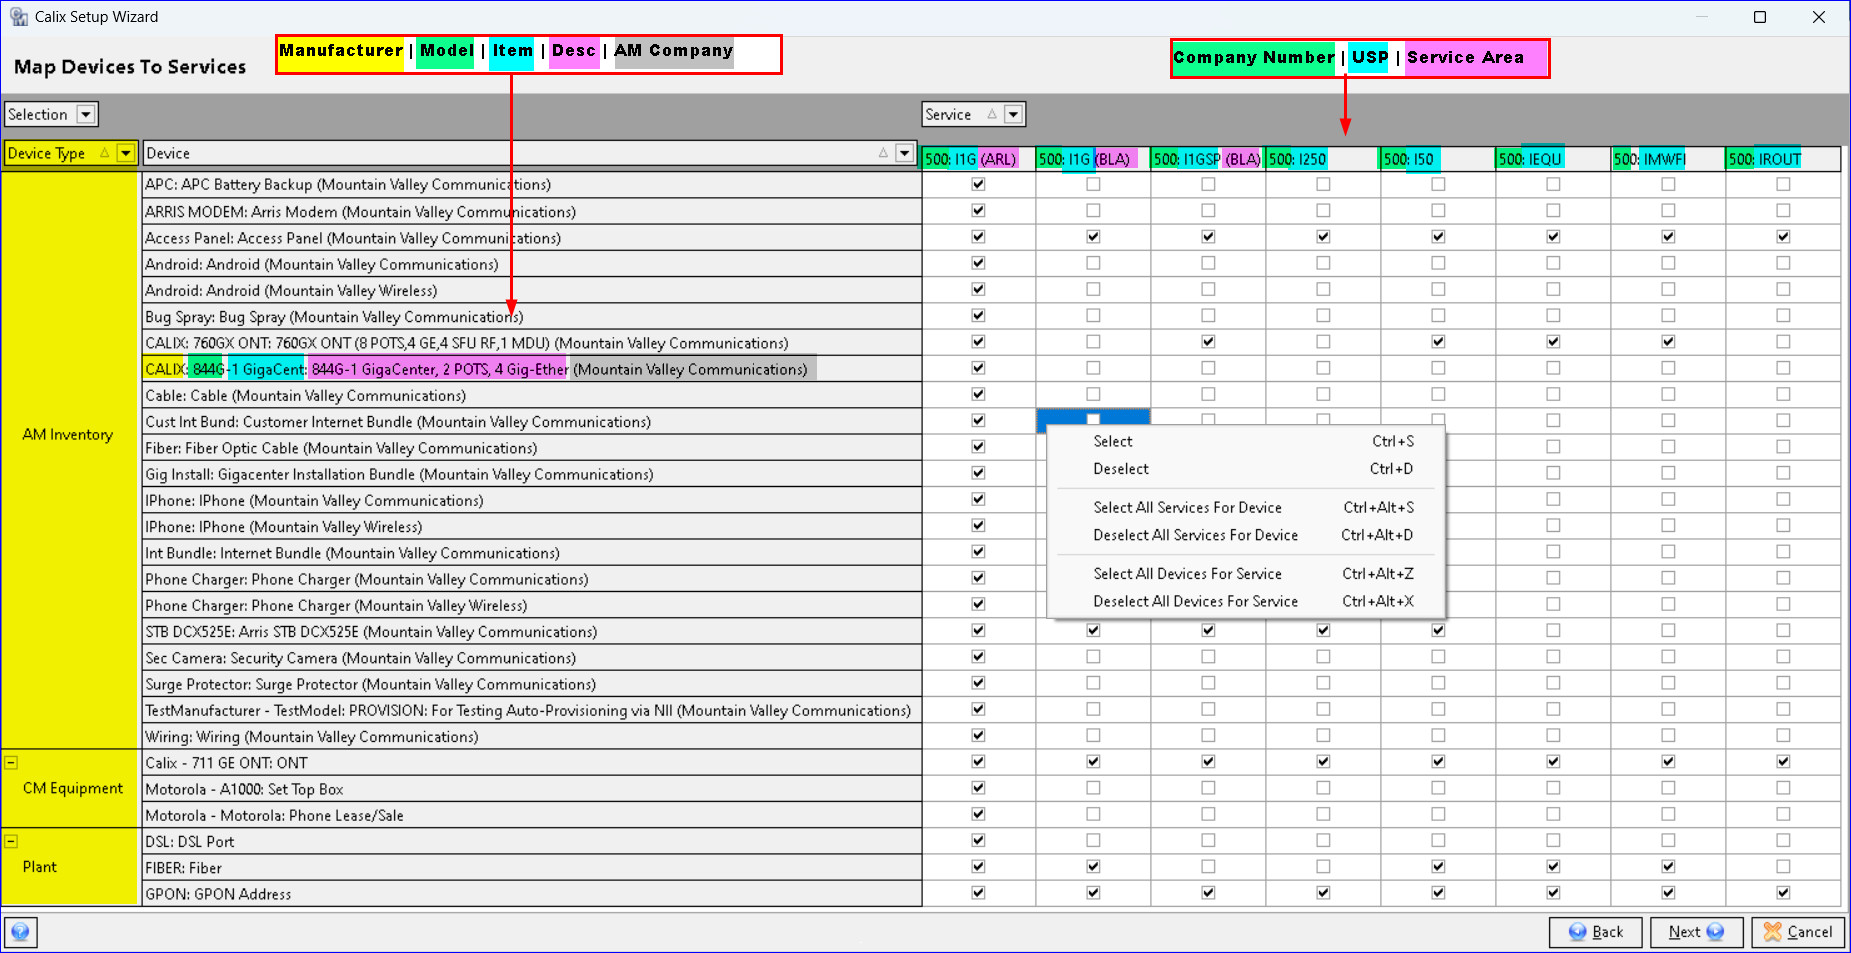
Map Devices to Services screen: The “Map Devices to Services” screen in the wizard is used to map the devices to the services. This can be a one-time setup that uses the current Service and Device selections in the wizard for the user to select which Devices should track which Services in Calix. The grid is populated based on the user’s AM Inventory, CM Equipment, and Plant device selections in the Calix Setup Wizard. Devices are grouped going down the left side of the grid and display the device information in the “Device” column. Services (USP Codes) go across the top, right side of the grid with checkboxes in the columns to select the service for the device. Right-click options on the grid are available for selecting an entire row or column. Filtering drop-downs are available on the toolbar and the columns in the grid.
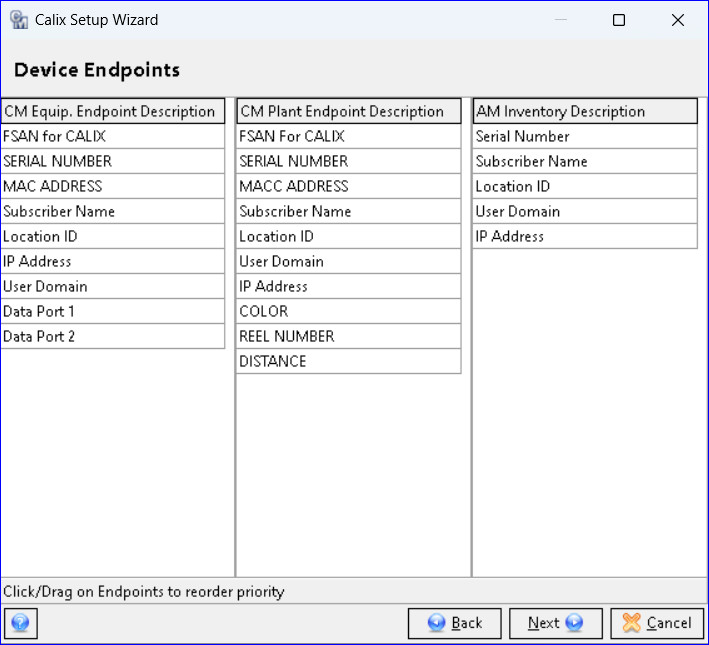
Device Endpoints screen: Three grids needed for Calix Support Cloud will be displayed in the “Device Endpoints” screen; a “CM Equipment Endpoint Description,” “CM Plant Endpoint Description,” and an “AM Inventory Description” grid. Each grid will allow the user to drag/drop the endpoints to prioritize and reorder them. Attributes must exist in the CM Equipment, CM Plant, and AM Inventory tables and be flagged as Calix, or they won’t be displayed in the grids.
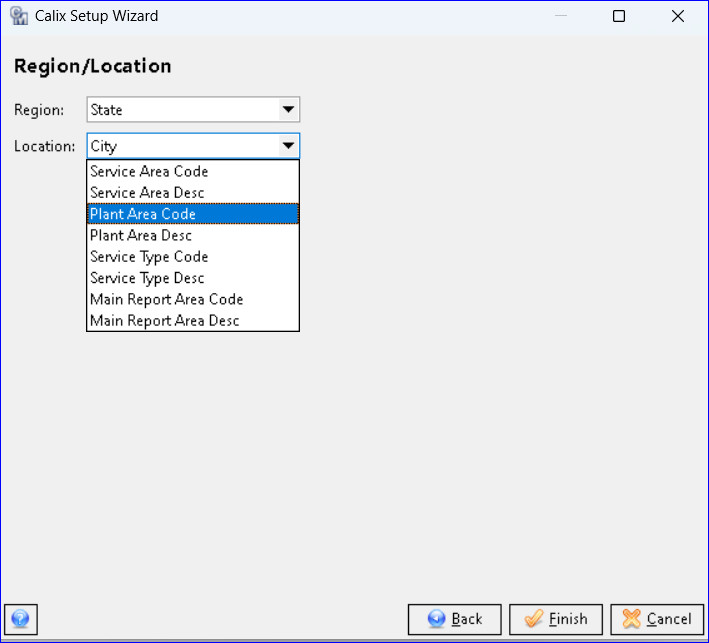
Region/Location screen: The final screen of the wizard, the “Region/Location” screen used with Marketing Cloud will only appear if the “Calix Marketing Cloud” service is activated in the first (Activation) screen. The “Region/Location” screen contains drop-down selections for transmission of region and location data to Calix via the API. A scrollbar along the right side of the drop-down menu can be used to scroll and see all the options. Clicking the “Finish” button will save all the selections in the wizard.
CALIX AUDIT TOOL
Tools | Audit | Calix Audit: The Calix Audit Tool can be used to extractdata sets from Calix and return what Calix has in their tables to the tool in Customer Mster and identify matches and discrepancies. The tool can then be used to true-up Calix data by selecting discrepancis and updating them with Customer Master data in mass from the tools grid. If Customer Master features need to be updated to match Calix, the user will need to preform changes manually by going to the erroneous feature in Customer Master and changing it. The Calix Audit tool has four data tabs to get and compare different data sets from Calix.
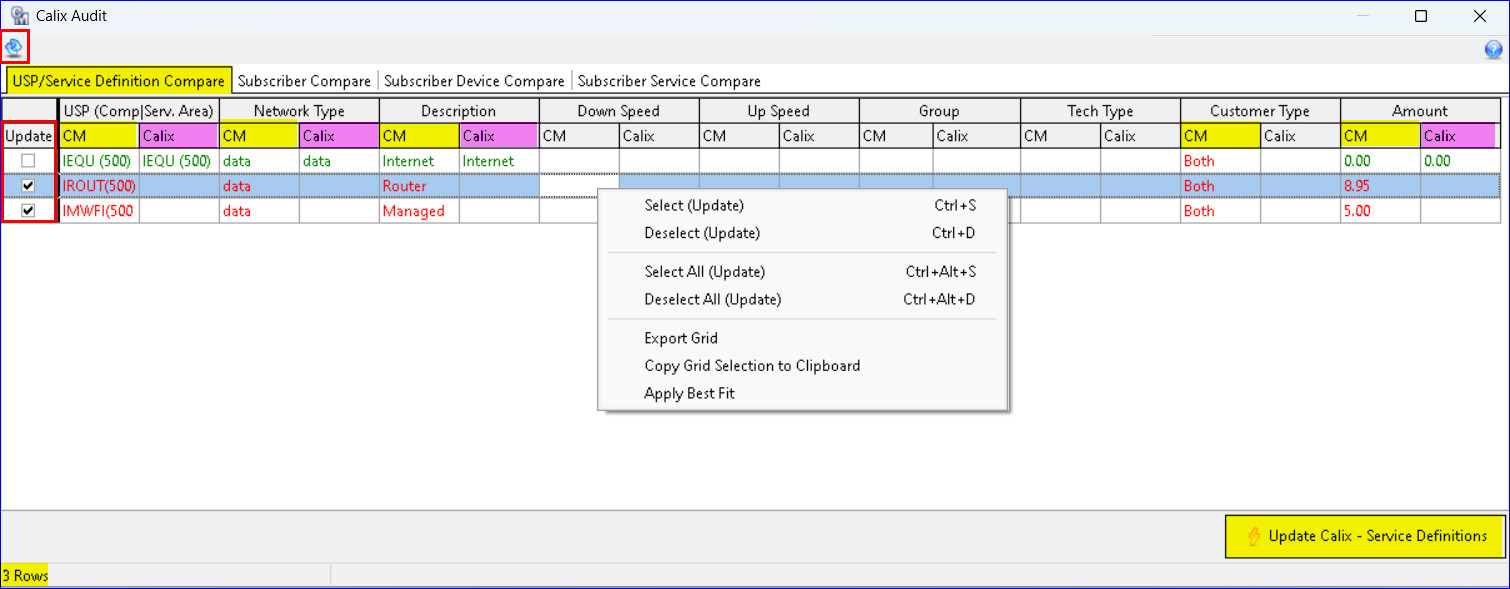
USP/Service Definition Compare tab: The “USP/Service Definition Compare” grid will load with USP codes that have been selected in the Calix Setup Wizard. Only USP records that do not fully match both Calix and CM will be displayed in the grid. If a field is only found in one of the sources (CM/Calix) or if the existing data in Calix does not match the current data in CM, it will be shown in red. If a field has matching data in both sources (CM/Calix) will be shown in green. Checking the “Update” box will update that record in Calix with the CM value via the API when the “Update Calix – Service Definitions” button is clicked. A right-click menu is available to Select/Deselect records. A “Refresh” button is available on the toolbar. A row count for each of the tabs is displayed at the bottom of the screen
Clicking the “Update Calix – Service Definitions” button will produce the “Service Definitions Audit” report, allowing the user to review a summary of updates that will be sent to Calix.

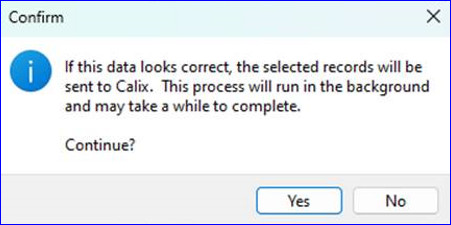
When the report is closed, a message will appear letting the user know if the data looks correct and the records will be sent to Calix. Clicking “Yes” will send the selected records to Calix and the row(s) will be removed from the grid. Values will be updated with CM values in mass and true-up Calix. Once these records are sent to Calix, CM and Calix will be in sync.
Subscriber Compare tab: The Subscriber Compare grid will display both CM and Calix values for each of the subscriber fields such as network and account information. Only network and account records that have at least one mismatched field will be displayed. Matching fields will display in green and mismatched fields will display in red. A scrollbar at the bottom of the screen can be used to scroll to the right and view all the data. Checking the “Update” box will update that record in Calix with the CM value via the API when the “Update Calix – Subscribers” button is clicked
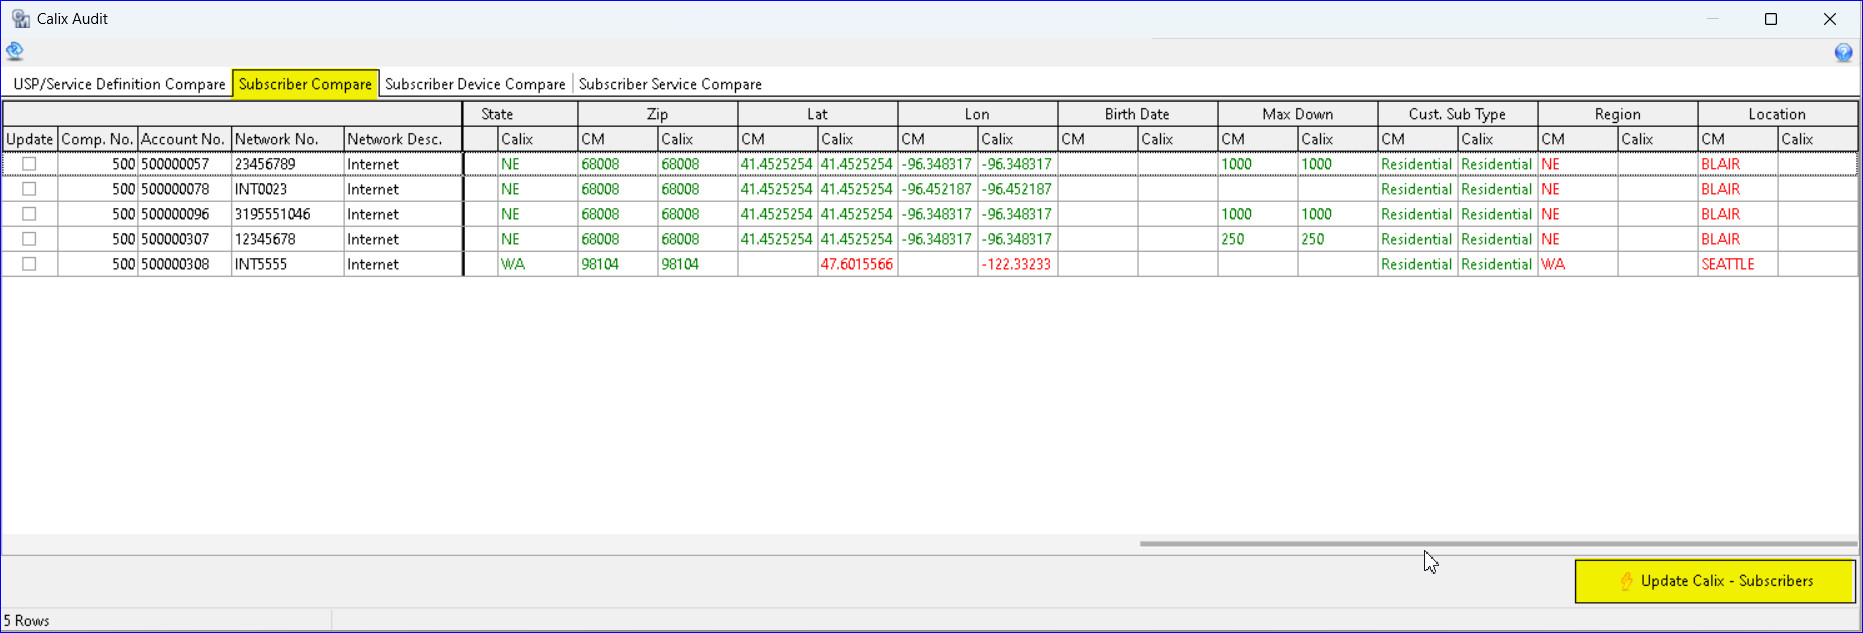
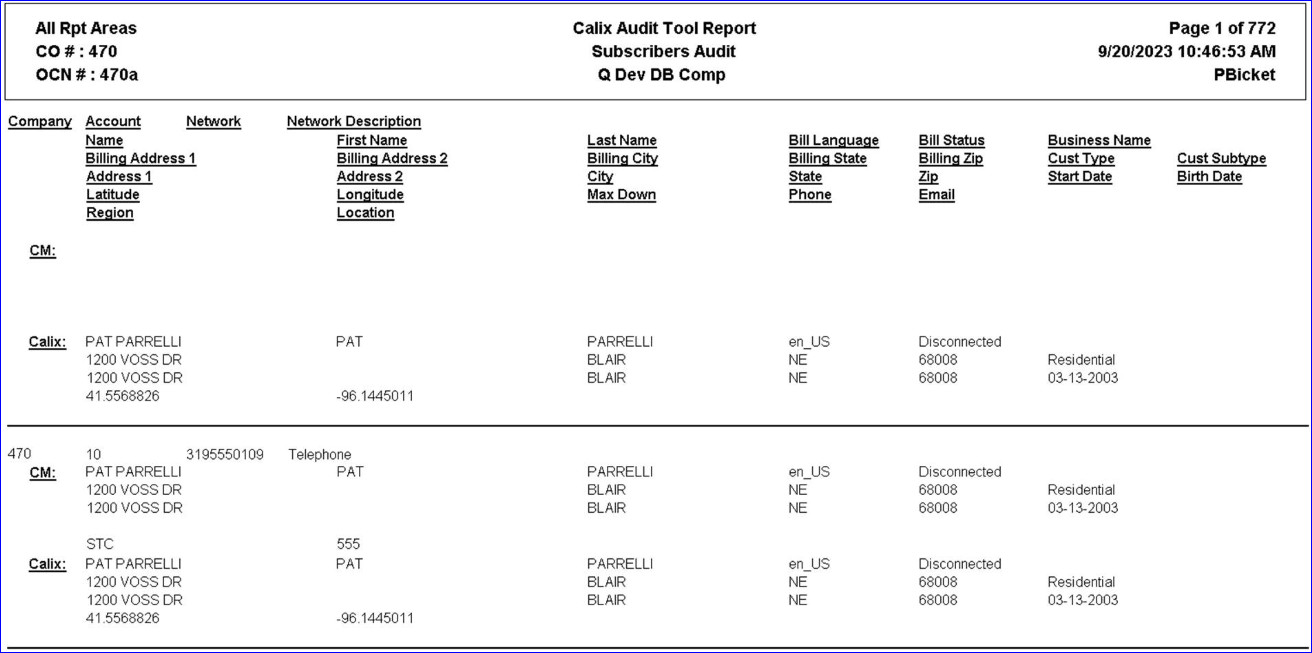
Clicking the “Update Calix – Subscribers” button will produce the “Subscribers Audit” report, allowing the user to review a summary of updates that will be sent to Calix. When the report is closed, the records can be sent to Calix.
Subscriber Device Compare: This tab will display any device that is found in CM, but not in Calix. The system looks for all Subscribers in CM to see if they have any CM Equipment, AM Inventory, or Plant items that have been selected in the Calix Setup Wizard. If any items don’t match the list of devices retrieved from Calix, they will be displayed in red. This tab will also display any device that is found in Calix, but not in CM, and in this scenario, the Device ID will display in the “Unknown” column. If the “Update” box is checked for one of these records, they will be deleted from Calix when the “Update Calix – Subscriber Devices” button is clicked.
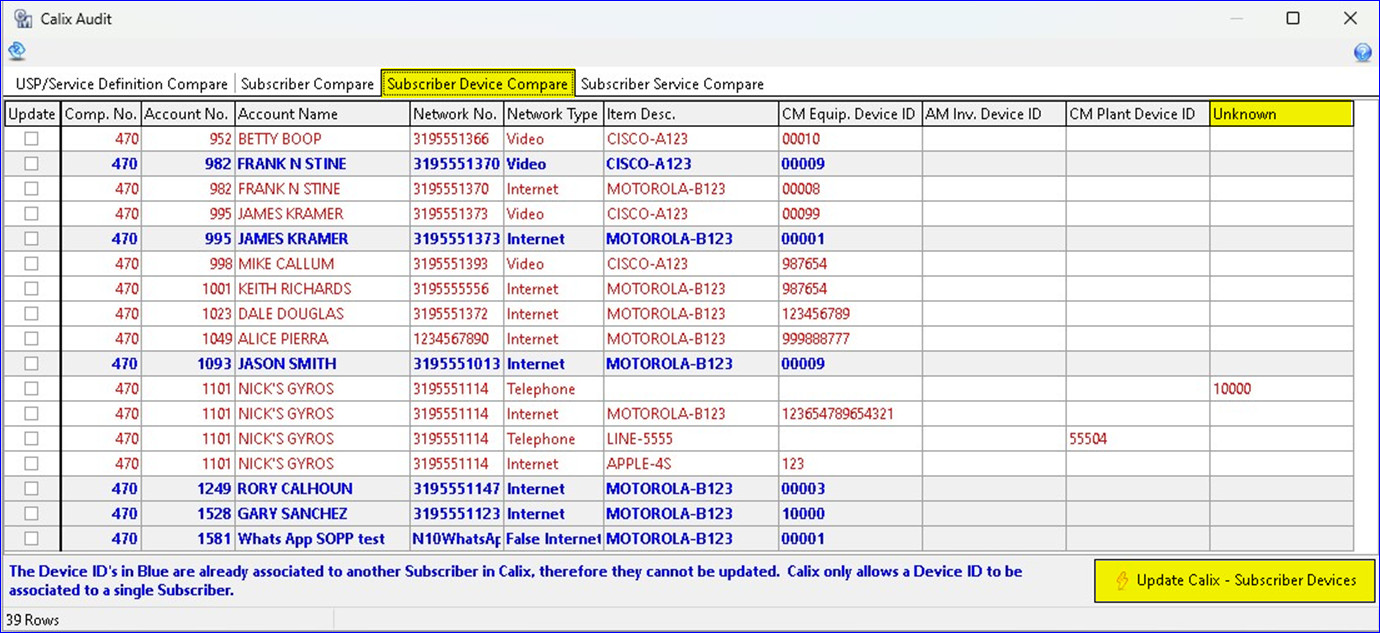
Clicking the “Update Calix – Subscriber Devices” button will produce the “Subscriber Devices Audit” report, allowing the user to review a summary of updates that will be sent to Calix. When the report is closed, the records can be sent to Calix.

Subscriber Service Compare tab: The “Subscriber Service Compare” tab functions just like the Subscriber Compare tab and is a list of services (network USPs) assigned to a subscriber. Matching items will appear in green, and mismatching items will appear in red. Right-click options are the same as the other tabs.
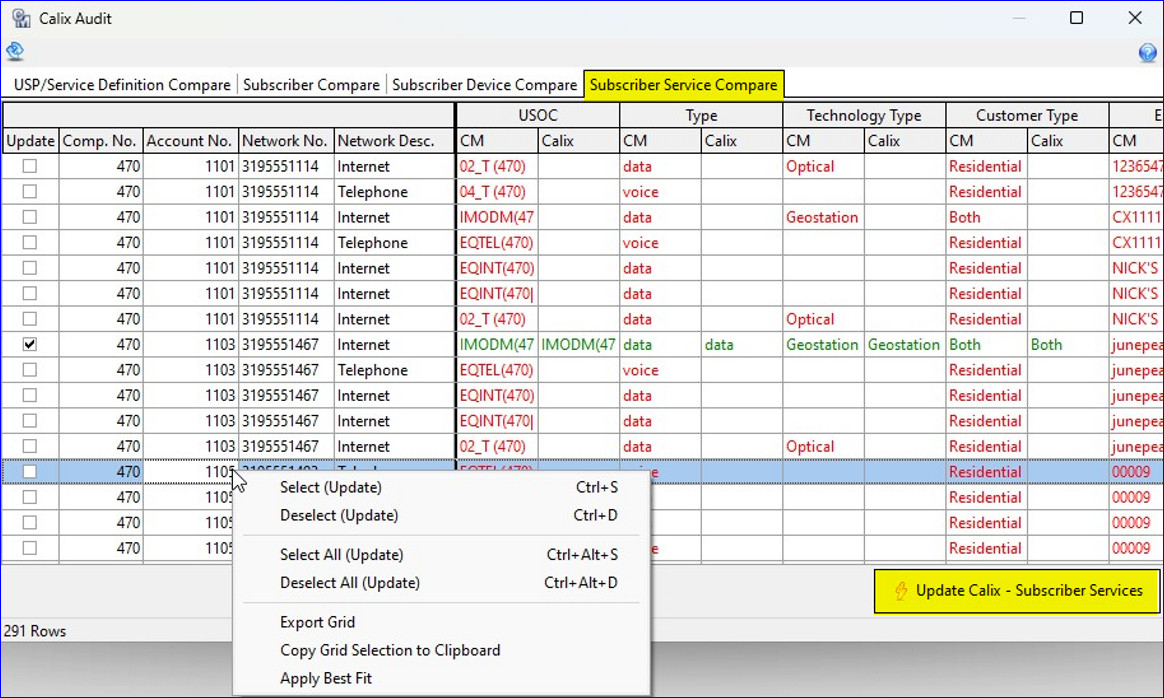
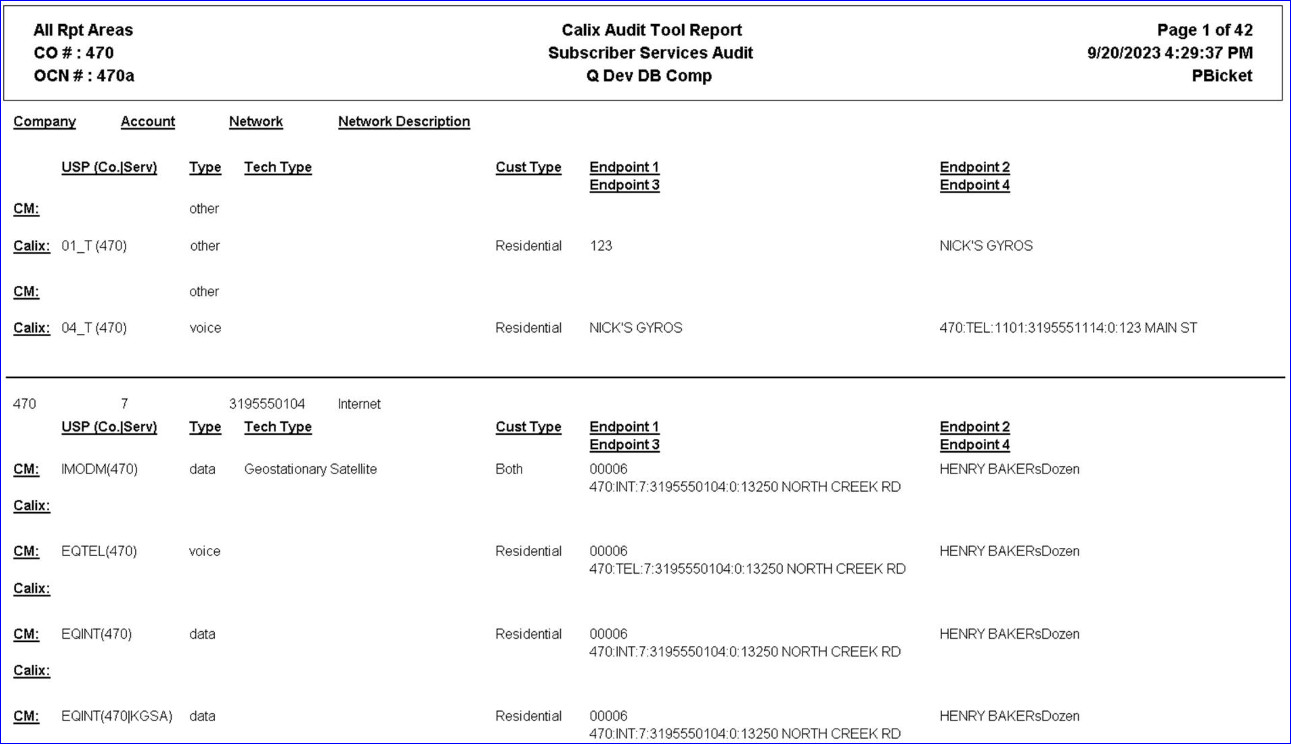
Clicking the “Update Calix-Subscriber Services” button will produce the “Subscriber Services Audit” report, allowing the user to review a summary of updates that will be sent to Calix. When the report is closed, the records can be sent to Calix.
