Tools 22.2
Mapping – New Service Availability Feature
Convenience is an attractive selling point to bring prospective customers to your business. With this in mind, enhancements were made in Customer Master and Web Self-Care to provide new and existing customers the ability to view services available to them on a map based on an address search. With some set up in Customer Master, Web Self-Care users can view services available to them on a map. Customer Master users can view the same map within the Map-It feature. Offering this new map feature can assist MACC clients using Web Self-Care to remain competitive with other telecommunication companies.
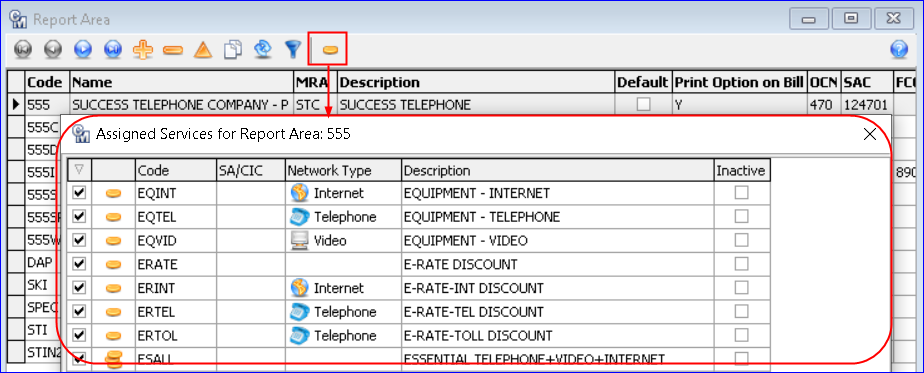
Maintenance | Common | Report Area: The Report Area maintenance screen was updated to have an “Assigned Services” icon on the toolbar. Clicking the icon opens a window titled “Assigned Services for Report Area” for the Report Area highlighted in the grid. This is similar to the Assigned Services grid accessible from other entry points in Customer Master. Users can select (assign) services for each Network Type by placing a check in the box next to the USPs they want to include for each Report Area.
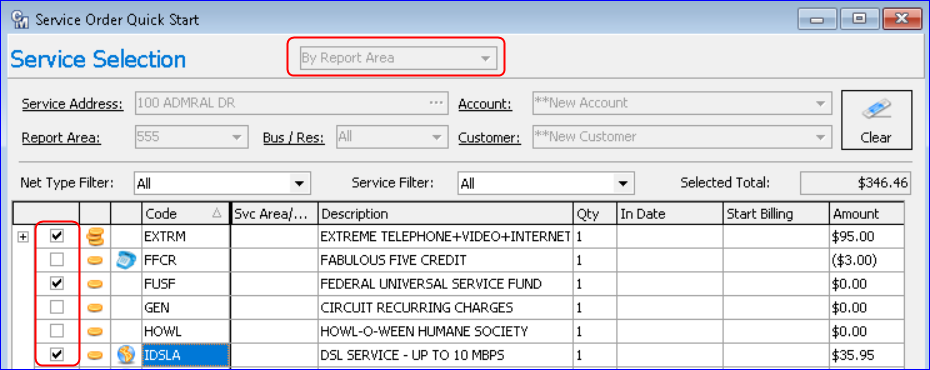
Packages | Service Order | New Account Quick Start: Report Area was added to the QuickStart Service Selection dropdown so users can assign services by selected Report Area and flag the selected USP codes to be available. When performing a Service Order via QuickStart, users can select Report Area in the Service Selection dropdown. All the services previously assigned to the Report Area in the Assigned Services for Report Area window will be available for selection. Selecting the USP codes will assign the services to the appropriate tiers for the new account.
Maintenance | Mapping | Map Areas: A “Service Availability” option was added to the Map Type drop-down menu. This option can be used to draw map areas to show Map-It and Web Self Care users services available to them in their area. Network type can be used but will not be required when Service Availability Map Type is selected. Area Type is a required field when a Map Type of Service Availability is selected and includes the following options from the dropdown: Plant Area, Report Area, Service Area, and Serving Equipment Area.
A “Report Area Color” dropdown selection field is available to assign to the selected Areas (Plant Area, Report Area, Service Area, and Serving Equipment Area) when defining an Area on the map. Whatever Area Type is selected, the Area Color label will change to reflect that selection. For example, if the Report area is selected, the label will display as “Report Area Color.” If Plant Area is selected it will change to “Plant Area Color” and so on. Once Service Availability areas are mapped, and a color is selected for an area, the area will display by the mapped geocoordinates and selected color in the Map-It feature.
Web | Web Map-It: A Service Availability tab was added to the Map-It screen to view a map of services available in selected areas based on the mapping in the maintenance table. When the Service Availability tab is selected, options for Area Type (required) and Network Type (optional) are available. The Area Type options include “ALL” and “Report Area.”
Report Area can be selected to view mapped areas by Report Area on the map. When Report Area is selected, any Network Types saved under Report Area will show in the dropdown list. When an Area Type is selected that was saved without a Network Type, “No Network Type” will be in the dropdown as a selection.
In addition, an “All” option was also added to the Trouble Outage tab’s “Area Type” dropdown selection.
When the “View Map” button is selected, the map will display based on Mapping Maintenance as defined by an area. The Map panel (right side of the web map) will list Area and Network Types mapped in the maintenance mapping screen. Users can check and uncheck an Area to display on the web map. Each area displayed on the map will be in the color selected for the area in the maintenance table. Note: To see Service Availability updates to Web Self-Care, please refer to the Web Self-Care update letter.
Telephone Number Import Type added to Importer Tool
At times there is a need to change quite a few telephone numbers in the Telephone Number table from one status to another. For example, as numbers are ported out their status needs to be changed in the Telephone Number table to In Use/Ported Out. These can be random numbers and not associated with a particular block of numbers. Now the Importer tool can be used to insert or change telephone numbers in mass in the Telephone Number table.
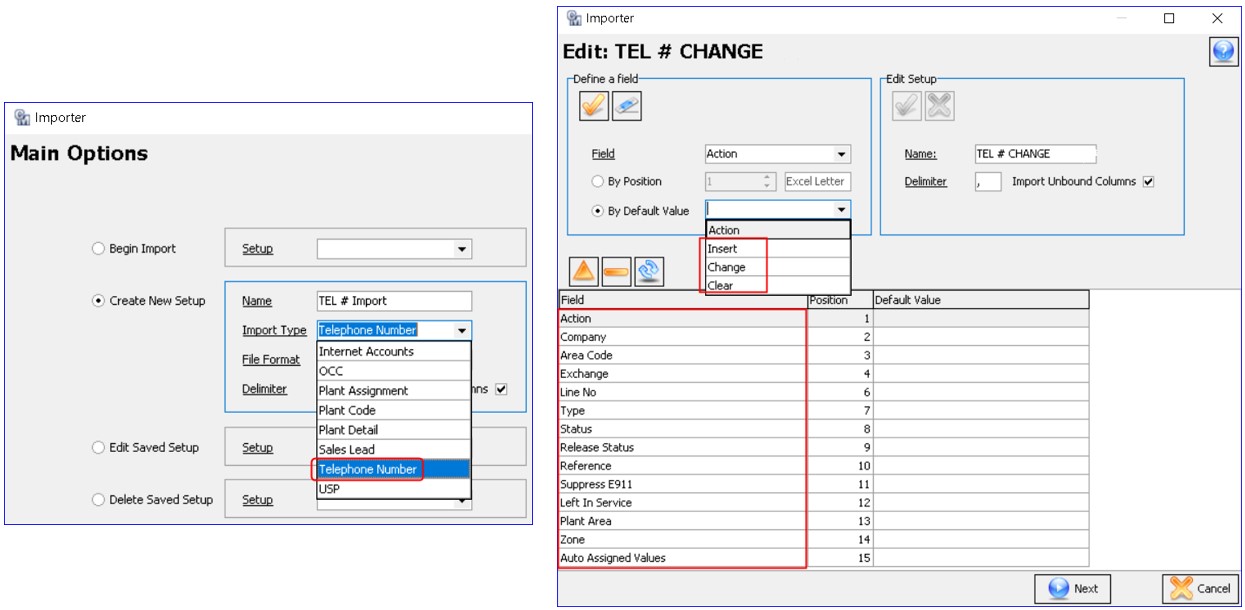
Tools | Mass Processing | Importer: An Import Type of “Telephone Number” was added to the Import Type dropdown in the Main Options screen of the Importer Tool. With this new import type users have the ability to make the following changes to the Telephone Number table at Maintenance | Common | Network Numbers | Telephone Number.
- Insert telephone numbers into the table
- Change telephone numbers Status, Release Status, and Reference
- Change the Auto-Assignment values in the table (Plant Area/Zones/Service Codes)
- Change the Flag for telephone numbers to Suppress E911 in the table
- Clear fields from telephone numbers in the table
In the Importer’s “Edit” screen, Action items allow users to “Insert,” “Change,” and “Clear” telephone number fields. All the fields from the Telephone Number Editor are available from the “Field” dropdown to be selected for updating. The Clear option can be used to clear fields from a telephone number(s) using the letter “Y” in the column of the field(s) you wish to clear.
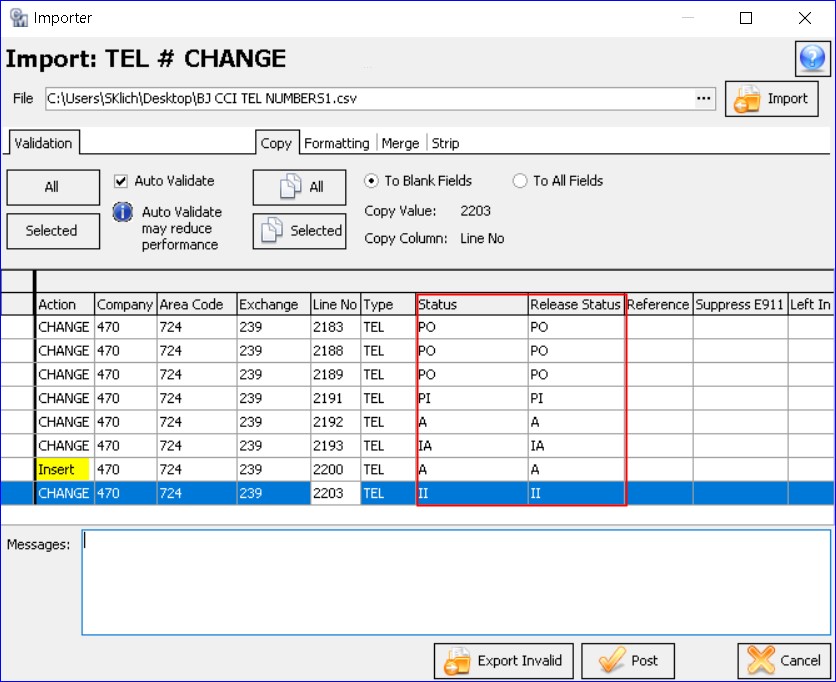
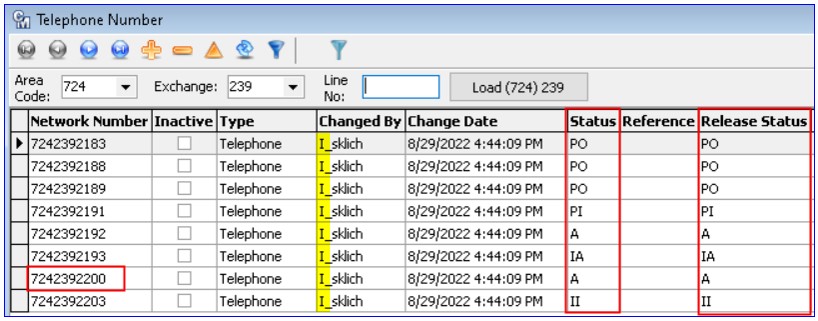
In the example, a group of random telephone numbers is set up in the Importer to change their Status and Release Status, plus the telephone number (724-239-2200) will be inserted. Some statuses are set to PO (In Use/Ported Out), PI (In Use/Ported In), A (Available), IA (In Use/Admin), and II (Intermediate).
Once imported those numbers in the Telephone Number table have the updated Status and Release Status, plus the number (724-239-2200) was inserted. In addition, the “I” before the user ID (I_sklich) in the Change By column indicates the numbers were updated by the Importer tool.
Geocoding Improvements
Geocoding in Customer Master has been enhanced to improve the process giving users greater flexibility, accuracy at the address, detailed scoring records stored in the database, a new Address Geocoding Log, and the ability to re-geocode selected addresses with scores less than 100.
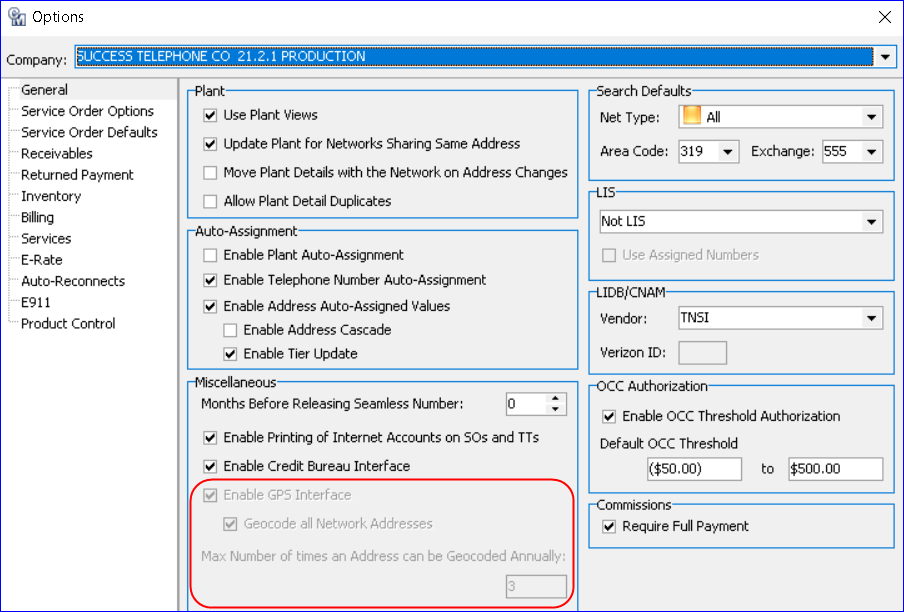
Tools | Options | General tab: A “Max Number of times an Address can be Geocoded Annually” field was added to the geocoding section in Options which limits the geocoding requests for an address to two times during a calendar year. The field is view-only which is set when the GPS Interface is enabled by MACC. If the GPS Interface was previously enabled, upon upgrade, the field will be set to “2.” When geocoding from the Address Editor, a message will display letting the user know they have exceeded the maximum number of times an address can be sent to ESRI and they will need to contact MACC for further assistance.
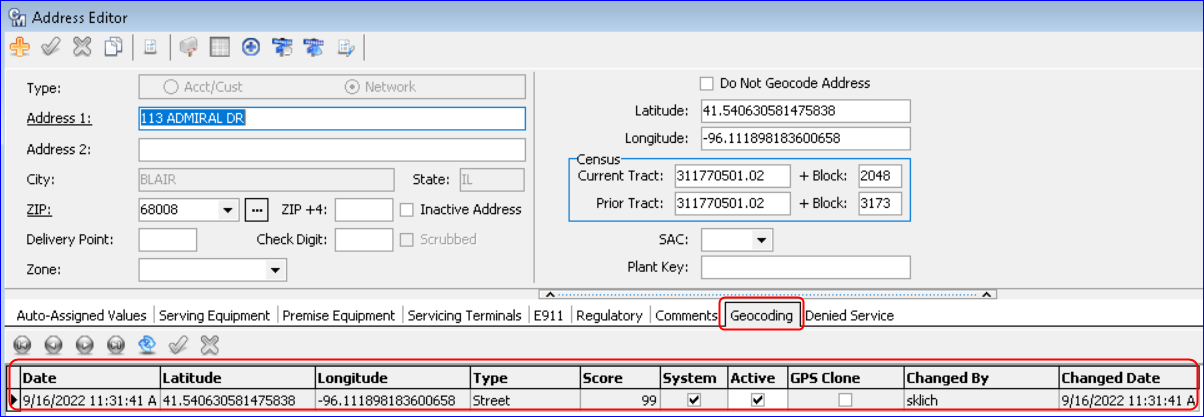
A new tab labeled “Geocoding” was also added to the network Address Editor. This tab will only be visible if the option to Geocode is enabled in Tools | Options. The Geocoding grid contains the following geocoding columns/information which cannot be edited:
- Date: Displays the most recent date and time the address was geocoded.
- Latitude: Displays the Latitude of the address if it is geocoded.
- Longitude: Displays the Longitude of the address if it is geocoded.
- Type: If an address comes back from ESRI with a score of 90-99 it will automatically populate the Type with one of the following types:
- Manual
- Street Address
- Rooftop
- Intersection
• If the address is flagged “Do not Geocode Address” when the Address Geocoding tool is run, the address will not be geocoded and the Type will be set to “Manual.”
- Score: This column will be populated only if the score from ESRI comes back in the range of 90-100.
- If an address comes back from ESRI with a score of 100 and a Type of Rooftop it will not be available for geocoding again as it is the highest score an address can receive.
- If users manually enter a Lat/Lon in the Latitude and Longitude fields at the top of the screen (below the Do Not Geocode Address check box) the Score and Type information will be blank.
- System: When checked it indicates the address was geocoded via the Address Geocoding tool at Tools | Mass Processing.
- Active: When checked it indicates the most recent data of the geospatial coordinates for the address which appears at the top of the grid.
- GPS Clone: This column will be checked to indicate if the data was copied from another address in the GPS Interface Wizard during the geocoding process. This typically occurs for duplicate addresses.
Note: The same occurs when manually adding a new address on the fly via the Service Orders address ellipsis button. Upon post, the address will automatically be geocoded and a row will be present in the Geocoding tab of the Address Editor and the Address Geocoding log.
Maintenance | Common | Address | Address Geocoding Log: A new icon labeled “Address Geocoding Log” on the Address grid’s toolbar can be used to view a log of geocoding that has occurred for the Address. The icon was also added to the Address Editor for access to the log from there. Upon upgrade to 22.2, a manual row will be placed in the log for addresses that had a Latitude and Longitude already populated and the “Active” column will be checked. If an address fails to be geocoded with the Address Geocoding tool a row will also be added to the grid indicating it failed. Failed addresses will have a blank Latitude, Longitude, Type, and Score. The “X” at the bottom left of the Address Geocoding Log grid can be used to change the view of the single geocoded address and expand the grid to include all geocoded addresses. The expanded grid is a great place to see the Score and Type ESRI returned for all the addresses. The columns in the grid can be filtered by hovering over the column to filter and using the arrow that appears. Note: The “Do not Geocode Address” flag can be mass updated from the Address grid using the “Mass Edit” (Lightning bolt) button in the Address grid.
Tools | Mass Processing | Address Geocoding: The Address Geocoding tool has been improved to be more user-friendly and flexible.
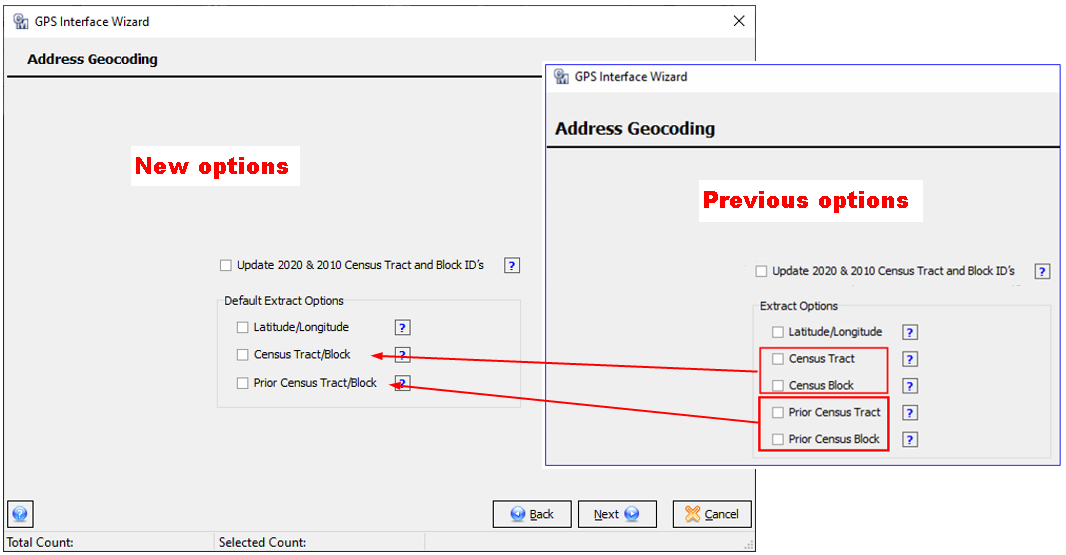
Address Geocoding screen: The first screen of the GPS Interface Wizard now has the Census Tract/Census Block options, as well as the Prior Census Tract/Prior Census Block options combined into one check box option. All the options can be selected as usual or not selected at all to advance to the next screen in the wizard depending on what the user wants to do. Previously only addresses without geospatial information would be available for selection to be sent to ESRI to extract data. Now any checkboxes selected will cause the tool to try to send all the applicable addresses the tool finds as a group to ESRI. If no selections are made on this screen users can click Next to advance to the selection screen and make more precise selections of the addresses they want to send to ESRI for geocoding. Not selecting any of the options can be helpful when users need to be very specific about the addresses they want to geocode.
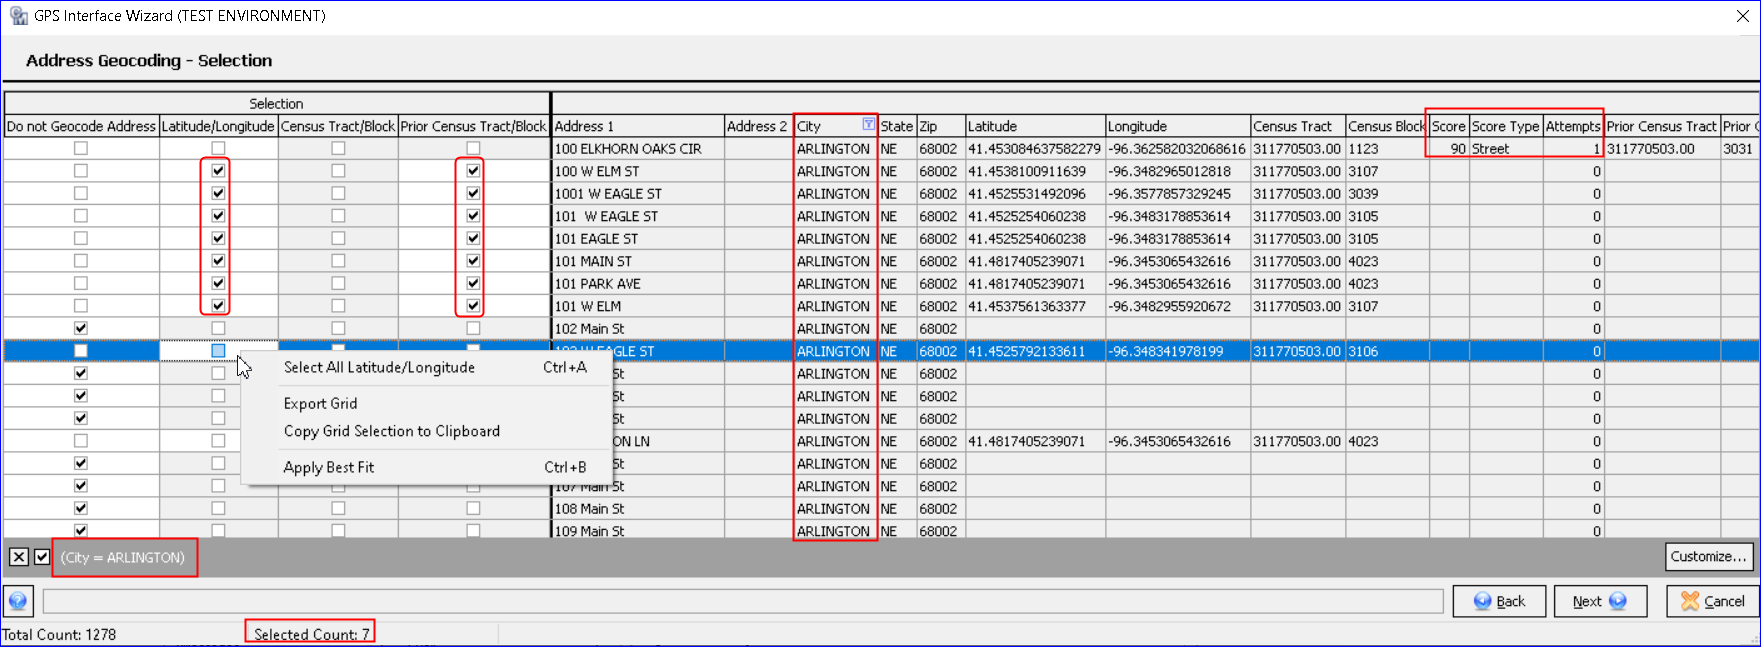
Address for Geocoding – Selection screen: Clicking Next will advance to the updated “Address for Geocoding – Selection” grid for the selection of addresses to geocode. The screen has been remodeled and is much more robust with greater grid capabilities. The grid displays all addresses whether they have been geocoded or not, and depending on the company settings, when the GPS Interface was enabled. Columns in the grid display any geospatial information previously extracted, similar to the address grid. Having this information in the grid is convenient when making address selections. All addresses can be sent to ESRI for data collection with some exceptions.
- Users can select/filter addresses they want to send to ESRI.
- Only the selected addresses will be sent to ESRI.
- Not all addresses and/or their fields will be updated as before, depending on what ESRI returns.
- If an address is checked as “Do not Geocode Address” the address will not be sent to ESRI to be geocoded and the row in the grid is grayed.
- If an address has reached the “Max Number of times an Address can be Geocoded Annually” it will display in the grid for geocoding but will not geocode successfully. If the row is selected to be sent to ESRI it will fail and display as red in the results.
• Any address(es) with a score of “100” and Type of “Rooftop” will display the Score, Type, Date, and Time in the grid and will not be sent to ESRI for geocoding. - Filtering the grid before geocoding provides the ability to only geocode addresses the user has filtered on. For example, the user may want to only geocode all the addresses by a certain City or by a certain Zip Code, Census Block, etc. Filtering also helps to send a smaller amount of addresses to ESRI for geocoding.
A vertical line divides the left and right sides of the grid.
Left Side of Grid: The Left side of the grid contains four stationary columns under the “Selection” header. The columns contain both selectable (white) checkboxes and non-selectable (gray) checkboxes. The column headers can be filtered by hovering over them and using the filter arrow. The columns can be dragged and dropped to change their position in the grid.
- When the “Do not Geocode Address” column boxes are checked the address will not be sent to ESRI to be geocoded.
- Any addresses flagged in the address table as such will be brought into the grid as checked.
- This column cannot be mass selected or deselected as the boxes must be selected individually.
- Checking this box is also helpful for addresses with coordinates a user does not want the tool to update. Check the box for any address you do not want to be updated.
- The white selectable checkboxes in the Lat/Lon/Census columns can be checked individually, and the right-click menu offers the ability to “Select All” or “Deselect All” by the column. Checking the boxes here is selecting those options to be sent to ESRI for geocoding for that address(es). Users can select only the Lat/Lon box for an address or both the Lat/Lon and Census Tract/Block. Whichever boxes are checked is what will be sent to ESRI.
Right Side of Grid: The information on the right side of the grid mirrors the geospatial information from the address grid for each address. A hover-over scroll bar at the bottom can be used to view all the address fields. A vertical scroll bar on the right side can be used to scroll up and down. Some address data may be populated, some may not. The columns can be filtered and dragged and dropped to change their position in the grid. New columns include:
- Score:
- A score of 90-99 will populate the Score, Score Type, Date, and time in the grid.
- A score of less than 90 will not populate any information and will be displayed in red.
- Score Type:
- Manual
- Street Address
- Rooftop
- Intersection
- Attempts (how many times the address was sent to ESRI)
The “Total Count” at the bottom of the screen displays the number of addresses in the grid. The “Selected Account” displays the number of addresses selected in the grid. As filtering and selections are made the number will change to show the new selected amount. In the example, the grid is filtered on the City of Arlington with checkbox selections to update the Latitude/Longitude and Prior Census Tract/Block of seven addresses. Notice how the Selected Account at the bottom of the grid displays “7” as well as the seven vertical boxes checked in the Selection columns on the left side of the grid.
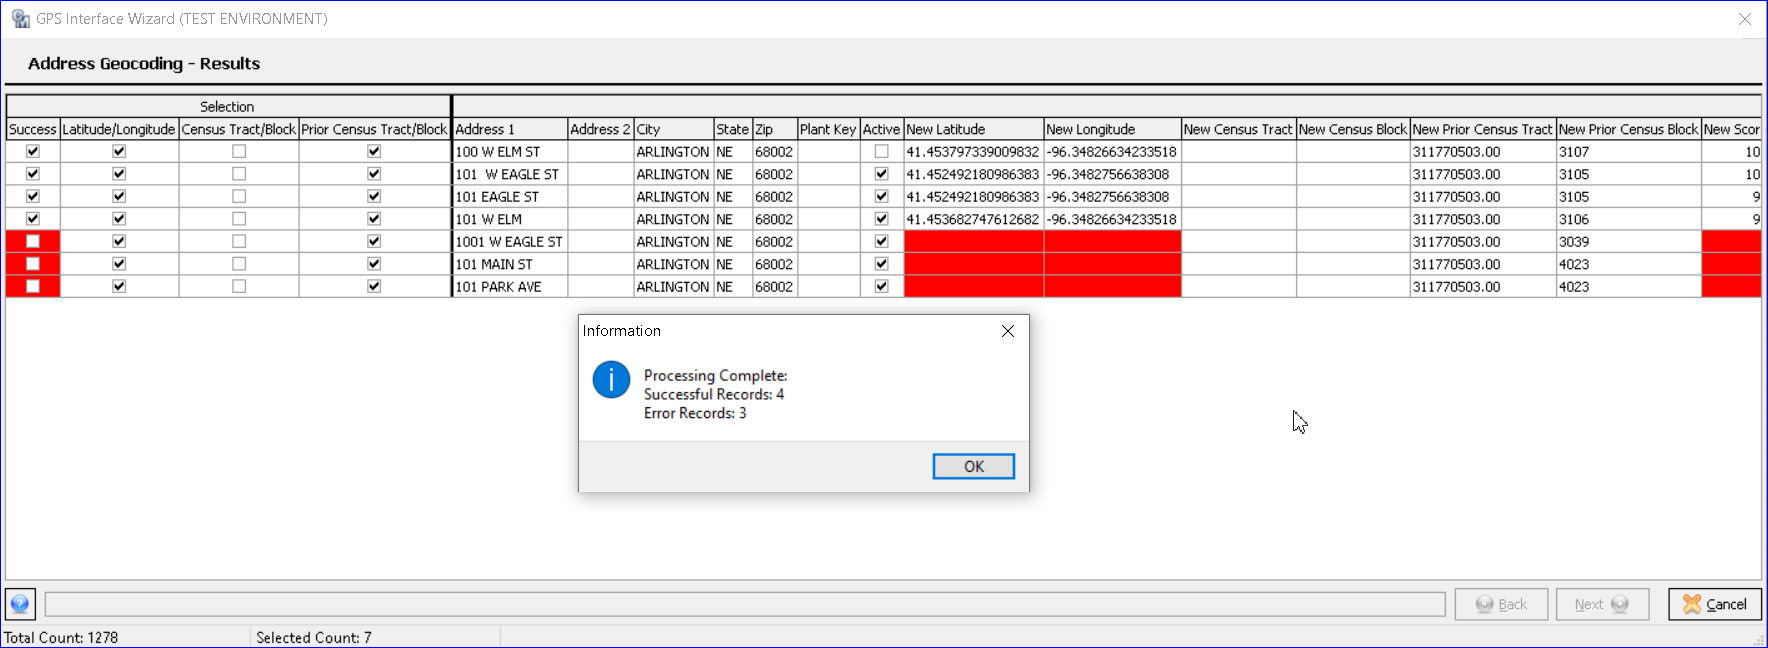
Address Geocoding – Results screen: Clicking the Next button will send all the selected addresses to ESRI for geocoding. The progress bar at the bottom of the grid will show the progress as before. The confirmation messages will appear letting the user know the number of addresses selected for processing. Clicking “Yes” will send the addresses to ESRI and when completed will display an informational message letting the user know the number of successful and/or errored records. The Success column on the left side of the grid displays a check for the successful records and unchecked/red for the errored records. The data that was not geocoded will also display as red in the applicable columns.
Clicking “Ok” on the message will enable the Finish button to complete the process. A Restart and Cancel buttons are also available. Use the Restart button to return to the first Address Geocoding screen. Clicking the Cancel button exits the screen and any processed or partially processed records will be saved. Note: Reports no longer pop up showing the successful/unsuccessful geocoded addresses as those are displayed in the grid. Users can right-click on the grid and export the grid for reporting.
Tools | Mass Processing | Importer | Address: The Address Importer was updated to mass update the “Do not Geocode Address” checkbox on addresses. In the Edit screen of the Importer tool with an import type of Address, a “Do not Geocode Address” field was added which can be used to update the checkbox on addresses. If the Latitude or Longitude is changed with the Importer tool a manual record will be added to the Geocode Log. Any addresses updated via the Importer tool will be flagged with a Type of manual in the Address grid/editor.
Reports | Grid Reports | Address: The column “Send to GPS” was changed to “Do not Geocode Address” in the following grid reports:
- Grid Report – Address
- Grid Report – Address by Census Date

